This is the begining of a series of tutorials for ATtiny3227 AVR programming, focusing on bare metal/register programming, with ATtiny3227 as the target MCU (but applicable to all Modern AVRs such as ATtiny 0, 1 & 2 series, ATmega 0-seris, and AVR Dx-sereis), with a development environment based on VSCode editor, a makefile, and avr-gcc c-compiler.
This list will be updated when a new tutorial is made available.
Modern AVRs
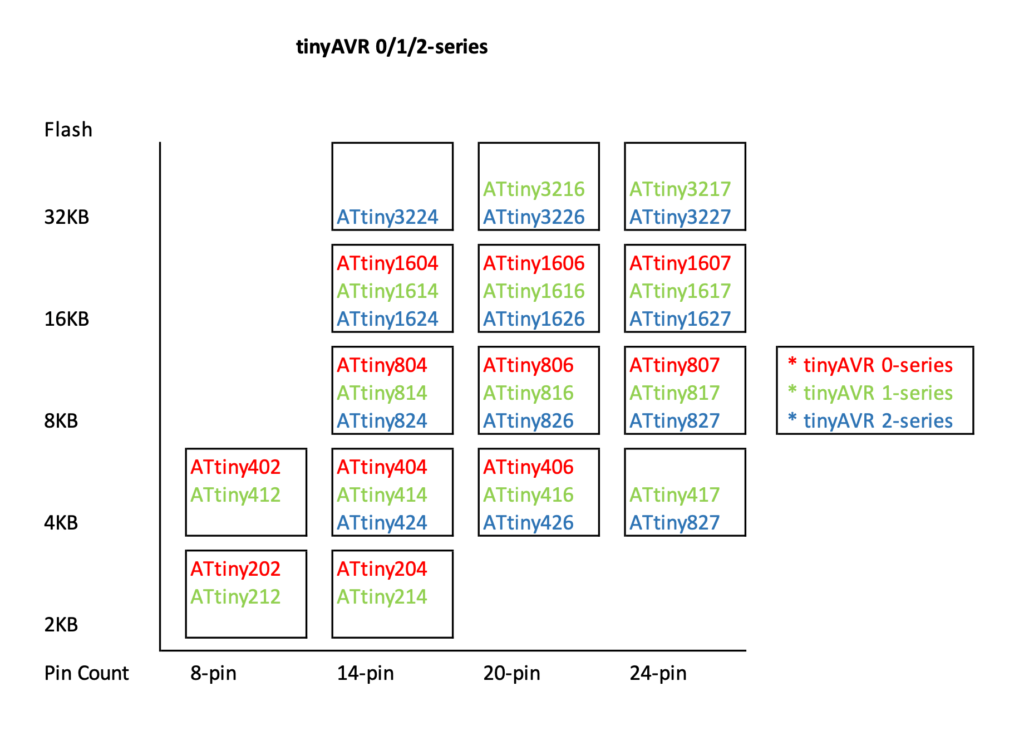
Microchip releases several series of AVR microcontrollers since 2017, namely the megaAVR 0-series, tinyAVR 0/1-series, and the AVR Dx-series. It further expands the lines with tinyAVR 2-series, and newer AVR Dx-series even in the middle of Covid pendamic and during global semiconductor shortage in 2020-2022. Collectively, I like to call those new chips as Modern AVRs as compare to the classic AVR chips that were introduced nearly two decades old. One of the most popular Classic AVR chip is ATmega328 (part of Classic ATMega series), which is used in Arduino Uno, Arduino Nano and Arduino Pro Mini, and another one is ATtiny85 as part of classic ATTiny series.
Modern AVR is not an official name from Microchip, it is my own naming convention to differentiated from the classic AVR chips such as ATmega328 and ATtiny85.
The modern AVR chips use the familiar AVR instruction set and open source avr-gcc compiler used in the classic AVR microcontrollers, with enhanced/improved instruction set, re-designed and more capable on-chip peripherals at highly competitive prices. One of the fundamental changes as compare to the classic AVR chips is the use of 130nm semiconductor manufacturing process as compare to the 350nm process used in ATMega328 (and 280nm process for ATMega328P later introduced in 2008), the reduce in silicon die means lower power consumption, higher speed, and lower cost. The new manufacturing process for 130nm also leads to be able to operate at lower voltage level with better yield. Many of the new chips are now capable of running at 1.8v, 3.3v and 5v. Some of those chips with 32-pin count has a form factor as small as 5mm x 5mm in VQFN package.
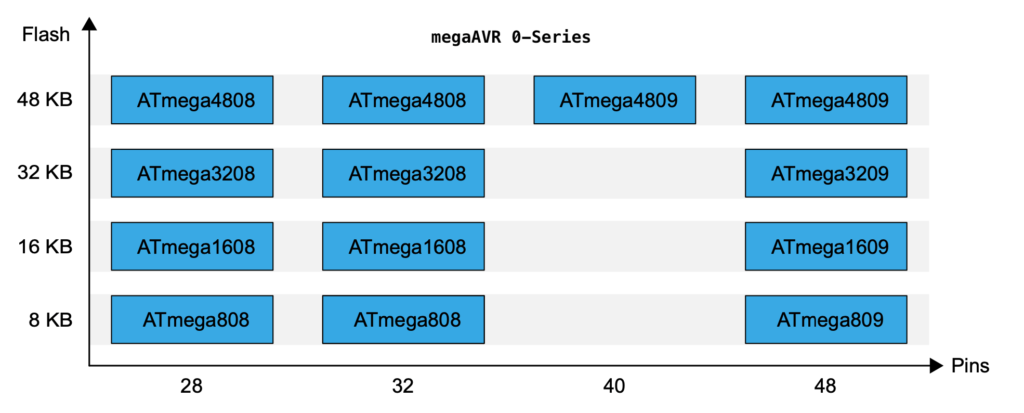
The best known of this new line of chips among Arduino hobbyists is the ATmega4809 as part of megaAVR 0-series, which is used on the Arduino Uno WiFi Rev.2 and Nano Every.
The release of those Modern 8-bit MCUs means that 8-bit MCUs are far from dead, Small pin-count MCUs are often found in comsumer "white goods", from washing machine, microwave, to alarm clock, kitchen timer, etc., selling at billions of units. They seem to be the perfect candidate for simple products that don't need all the features and fine-tuning capabilities of the newer 32-bit MCUs. 8-bit MCUs are also substantially simpler to program, which translates into easier to learn and faster development time.
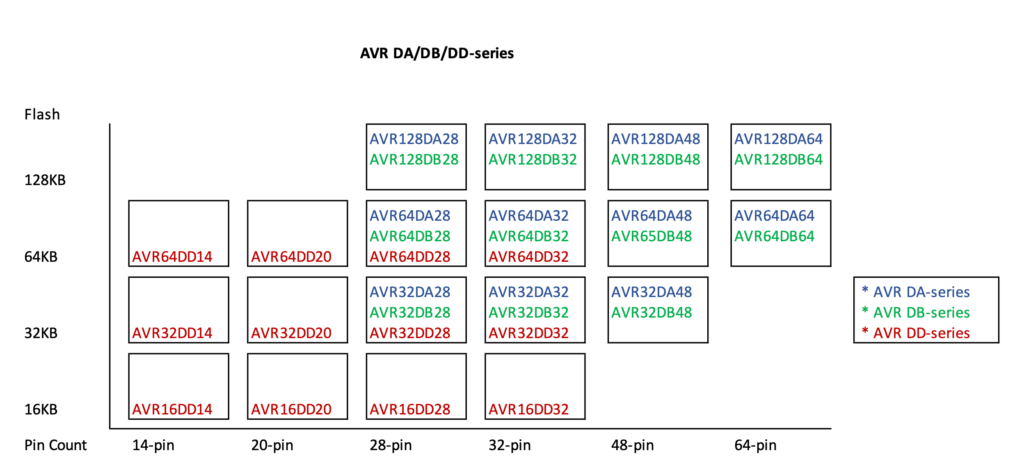
All the the megaAVR 0-series, tinyAVR 0/1/2-series, and the AVR Dx-series share the similar design and core, but with different peripherals and memory size.
Development environment
There are so far 4 Arduino Cores available for Modern AVRs:
- MegaCoreX developed by MCUDude for MegaAVR 0-series
- Arduino Core for ATMEGA4809 CPU developed by Arduino CC for Arduino Uno WiFi Rev.2 and Nano Every, both are based on ATMega4809
- megaTinyCore for tinyAVR 0/1/2-series and
- DxCore for AVR Dx-series, both megaTinyCore and DxCore are developed by Spencer Konde
These Arduino Cores provide an easy way to get started with programming the Modern AVRs. However these Arduino Cores have the limitation, for example, you won't be able to find the libraries for using many of the advanced features that are available in the Modern AVRs. Arduino framework often provided limited capabilities for interrupt handling and complext timer configurations, and therefore not be able to fully utilizes the capability of the chip with the abstracted APIs. So many of the available APIs or libraries have limition or clumpsy-to-use APIs because it trying to fit with existing Arduino APIs, so we are not going to use any of those Arduino Core in this series of tutorials.
What we are going to do is to program the MCU by altering the registers of each peripherial directly (a.k.a. bare metal programming), with the help of c language. We will focus on one pheripheral or one particular functional block for each tutorial, starting from looking at the registers related to the peripherial, to see how to configure it and make it to perform some task or interesting thing.
Of course, Microchip offers all the tools necessary to program these modern AVR chips. Over the past several years, we've seen significant improvement on Window-only MicrochipStudio (formerly AtmelStudio) as well as MPLAB X IDE (NetBeam-based IDE running as Java app, making it capable of running on Windows, Liux and MacOS).
Instead of using Microchip development environment and APIs, we are going to setup our own development environment, based on Microsoft VS Code. We will create a simple Makefile and install AVR toolchain for programming the ATtiny3227.
Our approach is generally guided toward macOS users, but should also be applicable to Linux or Windows environment with a few minor changes.
Hardware
We will focus on ATtiny3227 as the target MCU, but the lessons are mostly applicable to any MCU within the tinyAVR 0/1/2-series, megaAVR 0-series, and AVR Dx series. We will refer to the ATtiny3227 datasheet very often, so yous should download the datasheet from ATtiny3227 product page.
A minimalistic ATTiny3227 development board can be created. Microchip also has ATtiny1627 Curiosity Nano board that can be purchased directly from Microchip. We created our own development board, the schematic and design files can be found from our github repository.
The ATtiny3227 it comes with the following peripherals and features:
- 32kB Program Memory (Flash)
- 3kB RAM
- 256 bytes data EEPROM
- Capable of operating at 1.8 - 5.5v
- Running at up to 20 MHz with internal clock
- 6 channels Event System
- Configurable Custom Logic (CCL)
- Single pin UPDI programming interface
- 12-bit Differential ADC with Programmable Gain Amplifier / 15-channel ADC (Single-ended)
- 1 x Analog Comparator with internal DAC reference
- 1 x 16-bit Timer/Counter type A (TCA)
- 2 x 16-bit Timer/Counter type B (TCB)
- 1 x 16-bit Real Time Counter (RTC) with Periodic Interrupt Controller (PIT)
- 2 x USART
- 1 x SPI
- 1 x I2C
One of the differences between Modern AVRs and classic AVRs is the programming interface, Modern AVRs use a different programming protocol called UPDI (Universal Interface), which requires only 2 pins (UPDI and GND), as opposed to the 6-pin ISP on the classic AVRs. A SerialUPDI programmer can be made with a simple USB-to-serial adaptor with a diode and a resistor, and program the MCU using the same programming tool AVRDude as in Arduino Uno.
Install toolchain
First thing we do is to install AVRDUDE(AVR Downloader Uploader) - which is the program for downloading and uploading the on-chip memories of Microchip’s AVR microcontrollers. If you have Arduino IDE installed, it is integrated with the Arduino IDE. But we need it as a standalone installation so that we could use it to upload compiled binary code to the target board.
On MacOS, AVRDUDE can be installed through Homebrew with the following command:
brew install avrdudeThis will install the avrdude in /opt/homebrew/bin/avrdude directory.
To install AVRDUDE for Linux, install the package avrdude by running the following commands:
sudo apt-get install avrdudeTo get AVRDUDE for Windows, download and install the latest version from the AVRDUDE github page.
By right, we should download the official toolchain which included the device pack for AVR Microcontrollers from Microchip, however as of this writing in June 2024, it seems that Microchip has stopped to update the , the latest version shown on the website is 3.7.0 dated 12 May 2022 is still lack of support for ATtiny 2 series chips, even though MPLAB X clearly DOES has the latest toolchain that support ATtiny 2 series. Luckily I had PlatformIo installed on my computer and the toolchain-atmelavr from the platformio which is located at ~/.platformio/packages/toolchain-atmelavr
does support the ATtiny 2 series despite its version is similar to the Microchip one with a date code even earlier than the Microchip one as version `3.70300.220127", so we can make a copy out from the platformio installation.
cd ~
mkdir avr
cd avr
cp -r ~/.platformio/packages/toolchain-atmelavr/ .
Once we copy the toolchain, we need to set up the path
cd ~
nano .bash_profile
scroll all the way down to the end of the file and add the following line
# Add avr-gcc path
PATH="${PATH}:~/avr/toolchain-atmelavr/bin"
export PATH
Setup VS Code and Create a Project Template
We won't cover the installation of VS Code as it is quite straightforward and instruction is available at Microsoft website. We also won't cover the installation of necessary plugin, there are two plugins that we recommend to install, namely
Once VS Code and those plugins are installed. We can now start to create a proejct template and further configure the VS Code.
Assuming the toolchain-atmelavr is installed in a directory under user home directory, we will create a directory called template so that the directories would looks like this:
~/avr
    |--- toolchain-atmelavr
    |--- template
The template is basically a project directory consists of some basic files that we could used to create new project in future.
First, let cd into the template directory and create a .vscode directory and setup the c_cpp_properties.json configuration file for VSCode Intellisense and code completion.
cd ~/avr/template
mkdir .vscode
nano .vscode/c_cpp_properties.json
Copy and paste the following json file:
{
    "configurations": [
        {
            "name": "Mac",
            "includePath": [
                "${workspaceFolder}/**"
            ],
            "defines": [
                "__AVR_ATtiny3227__",
                "F_CPU=20000000UL"
            ],
            "compilerPath": "~/avr/toolchain-atmelavr/bin/avr-gcc",
            "cStandard": "c11",
            "cppStandard": "c++17",
            "intelliSenseMode": "macos-gcc-arm64",
            "configurationProvider": "ms-vscode.makefile-tools"
        }
    ],
    "version": 4
}
Since our target MCU is ATtiny3227, we therefore have the "defines": ["__AVR_ATtiny3227__"] setting, if you are using a different target chip, change this line accordingly. The "F_CPU=20000000UL" is equivalent to C preproceesor macro #define F_CPU 20000000UL, instead of defining it in every .c file, we added it here as part of the configuration. Press Ctrl-X and y to save the file. Launch vscode, the Intellisense and code completion should be ready. If you are not familiar with Intellisense and code completion, take a look at Intellisense page from Microsoft website.
Next, we will create a bare minimum main.c:
#include <avr/io.h>

int main() {

    _PROTECTED_WRITE(CLKCTRL.MCLKCTRLB, !CLKCTRL_PEN_bm);    // disable prescaler to run at 20MHz
    while(1) {

    }

    return 0;

}
The code _PROTECTED_WRITE(CLKCTRL.MCLKCTRLB, !CLKCTRL_PEN_bm); clear the Prescaler Enable PEN bit in CLKCTRL register which is equivalent to disable the default precaler value of 6, so that our target board will be running at 20MHz as specified in F_CPU.
We need a Makefile to tell compiler how the code should be compiled. Create a file name Makefile and add the following commands to it
MCU=attiny3227
F_CPU=20000000UL

ifneq (, $(filter $(F_CPU), 20000000UL 10000000UL 5000000UL))
    CFUSE = fuse2:w:0x02:m
endif
ifneq (, $(filter $(F_CPU), 16000000UL 8000000UL 4000000UL 2000000UL 1000000UL))
    CFUSE = fuse2:w:0x01:m
endif

clean: main.elf
    rm main.elf

build: main.c
    avr-gcc main.c -mmcu=$(MCU) -DF_CPU=$(F_CPU) -Os -o main.elf

flash: main.elf
    avrdude -c serialupdi -P /dev/tty.usbserial-* -p $(MCU) -U $(CFUSE) -U flash:w:main.elf

all:
    clean build flash
The first two lines specific the target MCU and the clock speed of our MCU going to run. It consists four groups of commands so that it allows us to:
Remote the previous compiled file main.elf with:
make cleanBuild the target file with:
make buildFlash the target file to the target MCU with:
make flashBuild and falsh in one command, this is equivalent to make clean build flash
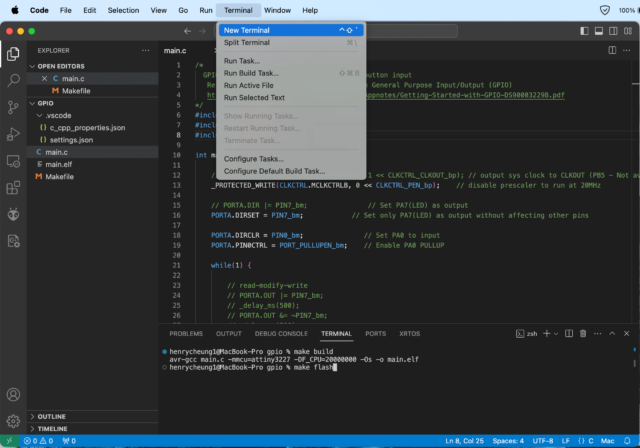
make allYou can test the Makefile from the VSCode, by click on Terminal -> New Terminal, this will open a terminal screen on the VSCode, now run the following command to build and flash the code to the ATtiny3227 board with one single command.
make build flashCreate new project using the template
We now have a project template that we could use to create new project. Every time when you need to create a project, you can follow the following steps to create a new project and launch VS Code.
cd ~/avr
cp -r template <new_project_name>
cd <new_project_name>
code .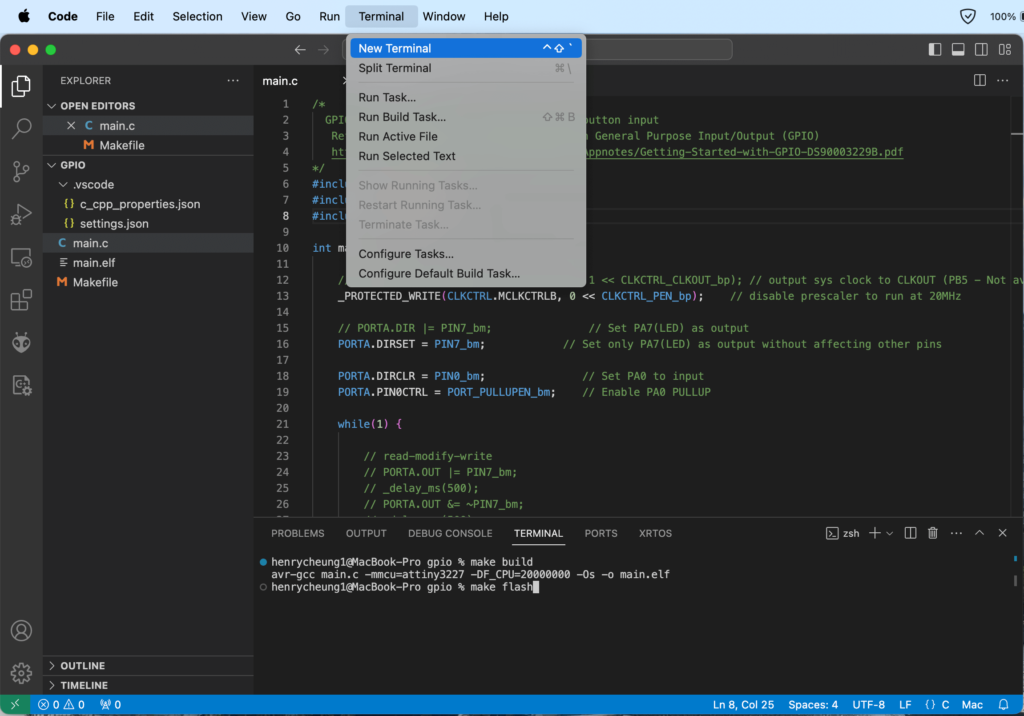
Next Step
We are all set and ready to start our journey and learn writing bare metal AVR code!
Before starting the next tutorial, we suggest that you read the MicroChip Tech Brief (linked provided below) to get familiar with bare metal coding style, even if you are familiar with old style register/bare metal programming used in classic AVR programming.
Great tutorial. Thanks for going through the trouble to post it. I’m looking forward to the updates.